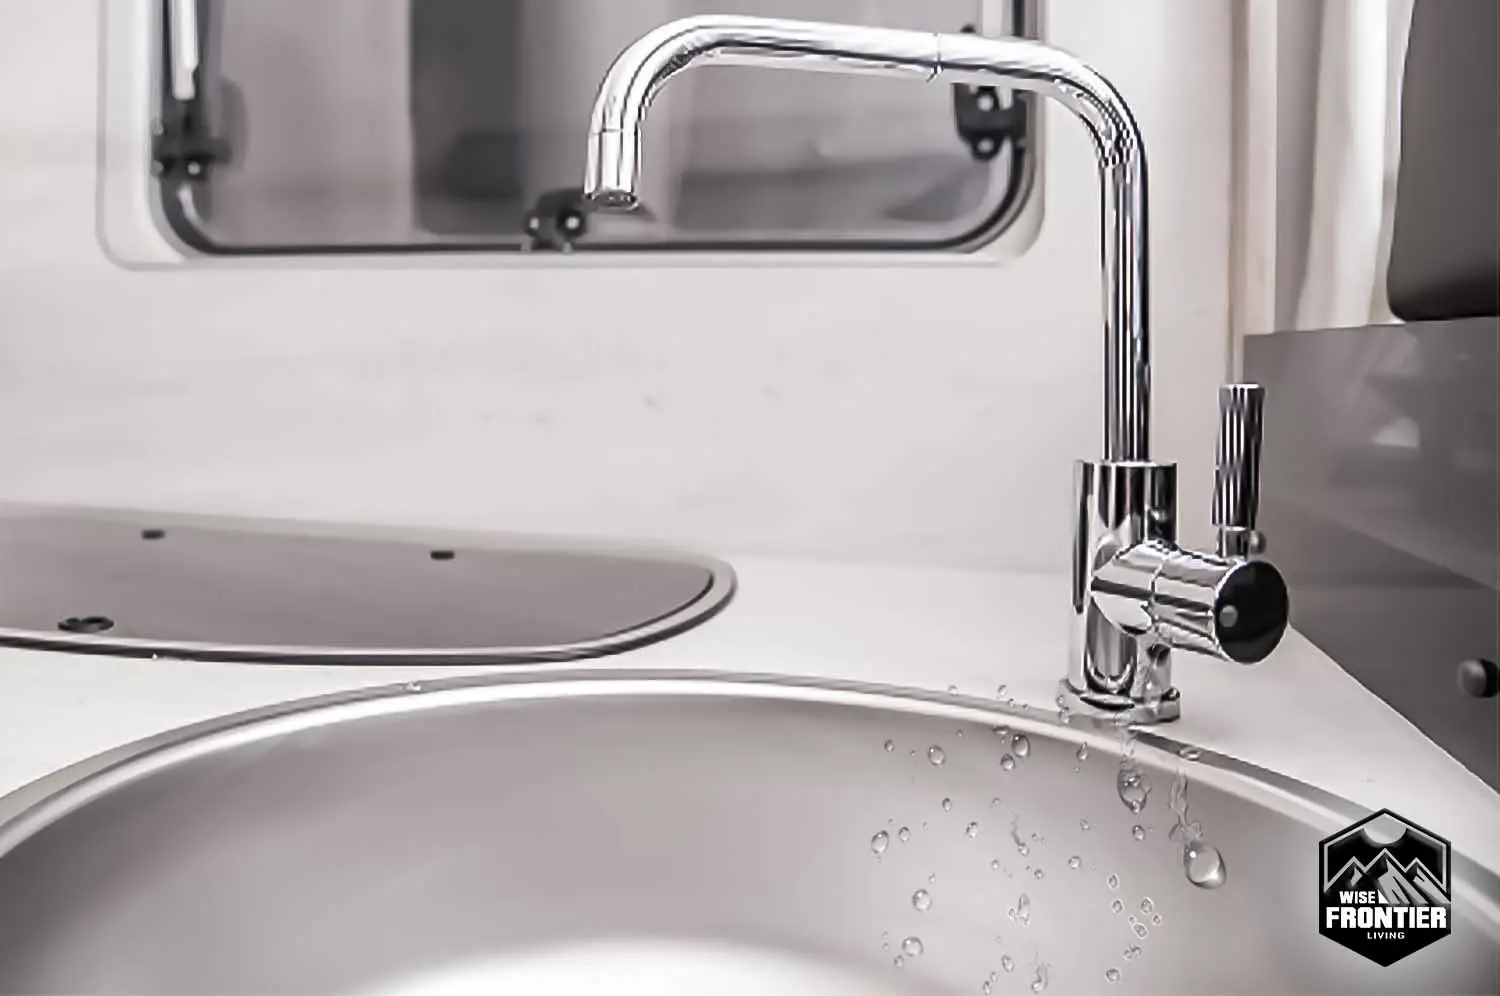
Whether you’re a full-time or part-time RVer, having a fully functional kitchen makes life much easier. The kitchen faucet is probably one of the most used items in an RV kitchen.
When living in an RV, water becomes such a precious resource. With limited storage for it, you have to make every drop count. So when a leak starts, it can put a damper on things.
The good news is that with the right tools and parts, you can fix a leaky RV kitchen faucet yourself without spending much money.
Note: This guide is for standard faucet types. If you have a folding collapsible faucet this may not be the best guide for you.
What Causes RV Kitchen Faucets to Leak?
RV kitchen faucets leak for several reasons, including but not limited to the following:
- Damaged cartridge, ball, compression, or disc.
- Dirt or lime buildup on valves and other components inside.
- Corroded rubber washers in the valves.
- Loose or corroded nuts or screws holding them together.
Deciding To Fix It or Replace It
You should decide whether you want to fix the issue in the existing faucet handle or replace the whole faucet.
After fixing and replacing hundreds of faucets myself, I can tell you sometimes it’s just better to replace the whole darn thing.
Trying to diagnose, find the source of the problem, and repair the issue can take hours or even days, especially for someone that’s never done this type of work before.
Even the pros can run into unexpected issues that slow down progress to a grinding halt. I’ve seen this happen on several occasions.
There can be a lot of trial and error if you plan to do the repair yourself. But you can do this and be proud of your work!
Recommended Read:
On the surface, the RV industry has many brands to choose from, but when looking deeper, most RV brands in the market are owned by three large companies. Check out our article below to see which brands are under the same umbrella.
Intro To Fixing RV Kitchen Faucet & Tools Needed
The first thing you should know is that there are several different types of faucets, each with its own similar yet unique repair process.
This general guide will pretty much get you 80% of the way there. You will need to apply a bit of common sense. This section will cover two handle faucet systems (single lever and two taps).
Fixing your own RV kitchen faucet only takes a few basic tools and a bit of your time. You don’t need to be an experienced plumber, but you do need to know how to use tools like screwdrivers, wrenches, and Allen keys.
Before you get started, here’s what you’ll need:
| Flathead screwdriver | |
| Set of Allen Keys | |
| Adjustable wrench | |
| Adjustable Pliers | |
| Needle-nose pliers | |
| Rag | |
| Knife | |
| Replacement Parts (cartridge, ball, compression, Disc) | |
| Bucket |
Note: As I stated above, there are many faucet types in the market, so you may not have a cartridge, or the removal steps may differ slightly. If you’re using major brand faucets like Moen, Delta, and American Standard, you’ll be able to get support, replacement parts, or find documentation online.
Pro tip: Spraying a bit of WD40 on the components like the threads will make removing and putting back parts a bit easier. I strongly recommend always keeping a can of WD40 in your RV. You can spray it into seized door knobs and hinges. It’s also great for stopping squeaky hinge noises. Thank me later for this tip! 😉
General Pre-Repair Tips
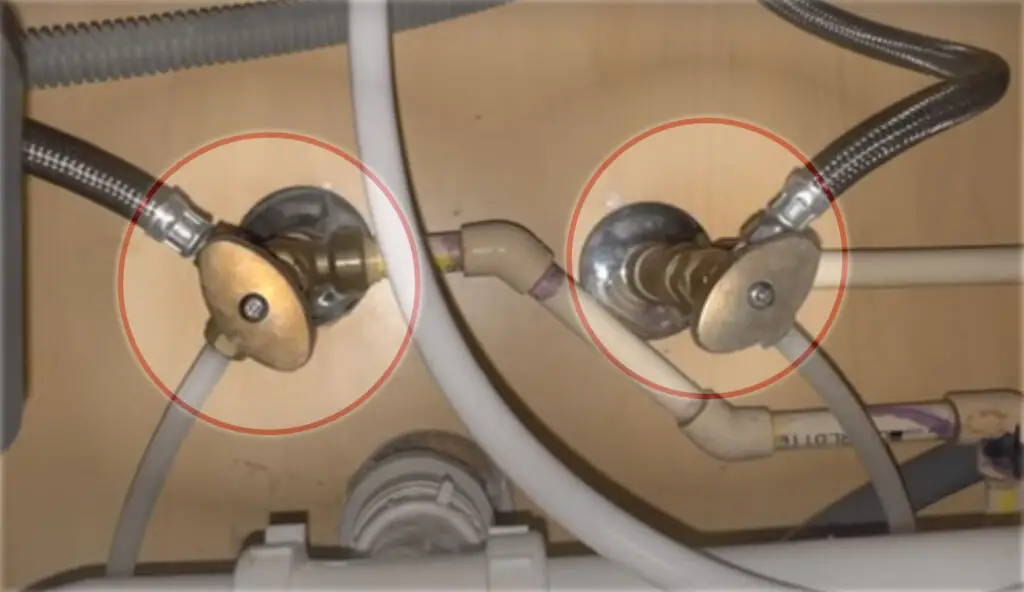
- Before repairing the faucet make sure to turn off the water shutoff valves. Many shutoff valves will be found underneath your sink. You should see two shutoff valves, one for the hot water line and one for the cold water line. Turn them clockwise till the water is off entirely. See the image below in figure 1.
- Drain the waterline. This step is not completely necessary, but I like to get into the habit of doing it. There may be built-up water and pressure in your water line. After shutting off the water, make sure to turn your faucet water on so it can drain any water sitting in the waterline.
- Plug your drain hole with a rag to prevent any parts like screws from falling into the drain. It has happened to me, don’t skip this step.
- Use your Allen key to remove the leaky faucet tap. Typically faucets use 3/32 Allen key size, but it’s good to have an Allen key set available in case you have to deal with size variance.
- Remove the faucet lever or taps by hand. If it’s difficult to remove, use your flathead screwdriver to remove it. Using a lot of hard water can create a lot of mineral and calcium buildup on your faucet, making it harder to remove. So you might need to use a bit of finesse to get it off.
Important note: You do need a bit of force but do not overdo it. You can create a bigger problem for yourself if you cause more damage. And if you’re RVing deep in the woods, it’s not like you can just run to the Home Depot down the street. - Once the top of the faucet handle is off now it’s time to use your wrench to remove the exposed cartridge. Be sure to put your wrench on the metal part of the cartage to get a firmer grip. Start turning the cartridge clockwise till it comes out.
- Remove the old cartridge and insert the new one.
- Reassembly – Before putting everything back together, take a moment to scrub down all of your old parts to make sure they’re clean and ready for reassembly. When putting items like valves into place, make sure that you don’t cross-thread screws.
Figure 1. Image of hot and cold water shutoff valves:
Identify & Repair Your Faucet Type
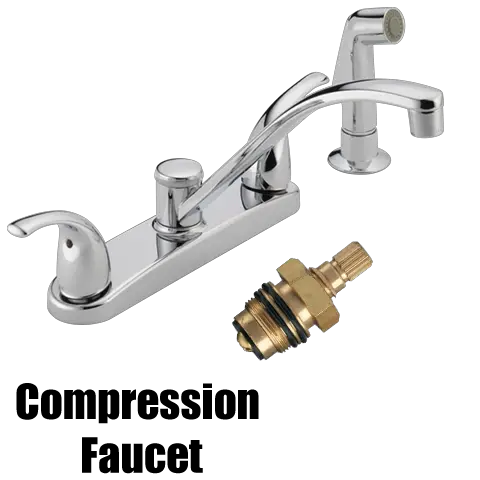
Figure 2.0 – Compression Faucet Image
Compression faucets are one of the oldest faucet types. In fact, they’ve been built into home plumbing systems since the invention of indoor plumbing – which is a pretty long time ago. Hence, they are usually found in older homes and installed with big sinks in the utility room in modern homes. You may not find this faucet type in your RV, but I want to cover common faucet types.
One thing about compression faucets is that they are the least expensive to procure and install. However, compression faucets are notoriously prone to leaks and drips when it comes to maintenance. This could be due to the old design that hasn’t changed since its inception.
They are identifiable via their two separate cold and hot water handles, and the operation of the compression faucet involves tightening down or loosening up the hot and cold water handles to get water into your sink.
If the water from your RVs faucet and shower is too hot, here’s a general guide to help you fix the issue. RV Water Too Hot: Potential Causes & Solutions
How to fix Compression faucets
Compression faucets consist of several parts – starting from the top, we have the handle itself, the hold-down nut, O-rings, stem, seat, washer, washing casing, and finally the bottom nut.
When your compression faucet is leaking, it is highly likely that the leak is happening because of a problem with the washer. The washer keeps the pressure airtight inside the faucet so that no water can get into the system from the mains.

- First, remove the handle of your compression faucet. Most compression faucet handles have a cap on top that pops off, followed by a screw that connects the handle to the entire system. Use a screwdriver to remove the handle.
- Next, use a wrench and unscrew the hold-down nut – this will allow you to access all the other parts of your compression faucet system below the nut. You should now see your faucet stem – remove the stem, and take the washer out (usually black and held in place by a brass screw), and then replace the washer with a brand new one.
- Finally, reverse the entire process until you pop the cap back onto your compression faucet handle. The steps above refer to only one handle at a time, so if you’re doing your hot handle first, repeat the process on your cold handle if you need to.
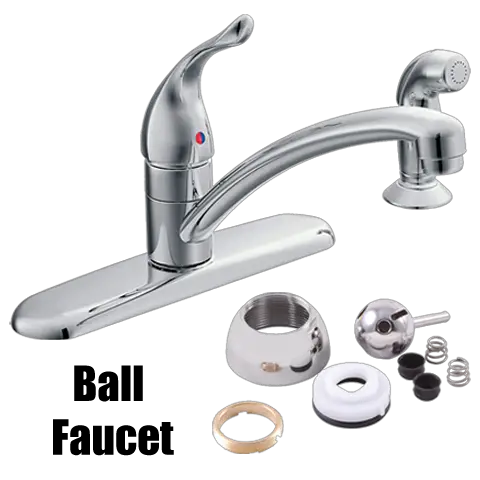
Figure 2.1 – Ball Faucet image
The ball faucet is one of the most common faucets found in kitchen sinks. They are identifiable by the one single handle that controls the temperature mix and speed of your water flow, and are the very first type of washerless faucet invented and sold on the market.
Inside the ball faucet, there is a rounded cap that sits above the base of the faucet spout. The faucet body contains a chambered plastic or metal ball that works together with spring-loaded rubber seals and rubber O-rings to allow the user full control over the pressure and temperature of the water coming out of it.
Many parts make up the ball faucet system, which is why they are usually more prone to leakage as compared to other washerless faucets such as the cartridge or ceramic-disk faucet.
How to fix ball faucets
When you’re fixing your ball faucet, it’s always a good idea to replace the entire setup all at once rather than fix a particularly small part. This is because a ball faucet system is complicated – however, an experienced DIYer can work some magic with a ball faucet repair kit from his local hardware store, some elbow grease, and patience.
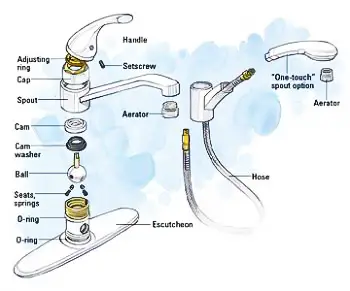
- First, you’ll need to remove the handle screw, and then remove the handle off the system. Remove the cap and collar with a pair of long-nose pliers. Next, look for the faucet cam tool in your repair kit and loosen the faucet cam.
- Once you have access to what’s under the faucet cam, remove the cam along with the cam washer, and the chambered ball. Now, you’ll want to remove the inlet seals and springs with a pair of long-nosed pliers. You should be able to see the O-rings right at the bottom of the system, where the Escutcheon is (which is the baseplate that covers the base of the faucet and connects it to the countertop)
- Cut off and remove the old O-rings, then replace them with brand new ones. Work your way backward and replace all the springs, cam washers, and valve seats (all found in your repair kit) as you go until you finally screw the handle back in again.
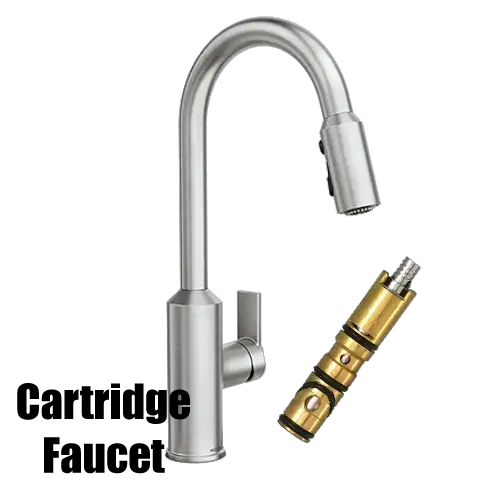
Figure 2.2 – Cartridge Faucet Image
Cartridge faucets look very similar to compression faucets, but that’s pretty much where the similarities end. They consist of two handles that operate hot and cold. However, the biggest difference between a cartridge and compression faucets is the way the handles feel when they are operated.
Compression faucets work via compression, which means the operator has to tighten down the washer hard to close the water flow. Cartridge faucets do not require any compression, as the cartridge installed inside the system creates a consistently smooth and easy feel across the entire turning axis of the handle. This is why cartridge faucet handles are generally lever-style as compared to the round valve styles found on compression faucets.
How to fix cartridge faucets
Cartridge faucets have pretty simple mechanics installed in the system. Basically, what you have from top to bottom is no more than the handle, O-ring, the cartridge, another O-ring, the seat, and the body cavity of the faucet where the handle is secured to.

- Most cartridge faucet handles have decorative handle caps that cover the screw that connects the handle to the system. Take off the cap, and unscrew the handle off the entire system with a screwdriver.
- Now you’ll be able to access the cartridge. The cartridge can be removed using a pair of long-nose pliers if it’s clipped into place. Otherwise, you can just remove it by hand. Replace your cartridge with a brand new one of a similar size.
- You will be able to see 2 O-rings once you’ve removed the cartridge. There are 2 O-rings at the top and bottom of the cartridge that will need to be replaced simultaneously, for the best results. Use a knife to cut off the old O-rings and replace them with a new pair.
- Once everything is replaced, fix everything back up in reverse order.
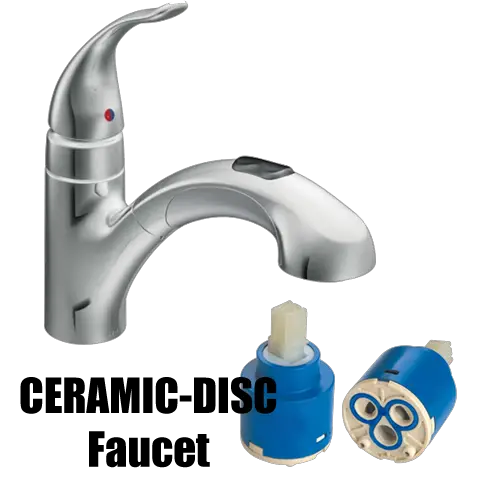
Figure 2.3 – Cartridge Faucet Image
Ceramic-disk faucets are the most advanced faucet type since the invention of indoor plumbing. You can identify a ceramic-disk faucet by the one single lever on the side of a wide cylindrical body that is connected perpendicularly to the vertical faucet stem. This single lever controls everything – water temperature, and water flow.
They are ideal faucet types for kitchens and bathrooms, and are especially popular for homeowners who have difficulty with gripping heavy compression faucet handles or cumbersome ball faucet handles.
When it comes to operating the ceramic disk faucet, the user barely needs to use any strength to move the single lever that runs the water. A pressure balance cartridge, temperature mixing chamber, and 2 ceramic water volume control disks installed inside the system work together to create the most easy-to-use faucet that is the most reliable and of the highest quality among all the modern faucet types.
How to fix ceramic-disk faucets
If you’re brave enough to attempt to fix a ceramic-disk faucet, we salute you! The ceramic-disk faucet is complicated, and should only be done by someone with experience who is confident with advanced DIY. If anything, we’d probably recommend just calling a plumber – it’s just going to save you plenty of time and effort.

- At the very top of the system is the handle – it is secured to the faucet via a set screw. Use a screwdriver to remove the set screw and remove the entire handle from the system.
- Next, use a pair of groove joint pliers to loosen the disk valve housing. Once it’s loosened, remove the 2 ceramic disk valves from the system. You should also see a black seal on the housing and a blue face seal installed on the base of the valve housing – use a flathead screwdriver to pry these out.
- Clean the 2 disk valves, the housing seal, and the face seal using an old toothbrush dipped in some white vinegar. Remove any buildup of sediment you see. If the buildup can’t be removed or if you notice any damage to any part of the system, you’ll have to replace the whole set of seals and the housing.
- Rinse the housing, face seal, and 2 disk valves with water, and grease them with a WRAS-approved grease before reassembling all parts back together. Work in reverse all the way up to the handle. Ensure that you don’t overtighten the ceramic disk valve as you secure it to the housing, as too much pressure will break it.
Considerations When Replacing Whole Faucet
If you’re considering replacing the whole faucet, there are a few important things to consider. How many faucet holes do you currently have in your countertop? This is important to know because it will determine the type of faucet you buy. Most RV kitchen faucets are the same kitchen faucets you would find in a home.
- If you currently have a 1 hole faucet system then I would recommend you purchase this same system. However, let’s say you fall in love with a classic style 3-hole faucet system. You can only use it by drilling 2 more additional holes in your countertop. That is the main reason I recommend reusing the same 1-hole system.
- If you currently have a 3-hole system(spout and 2 taps) you are not tied to one type of faucet system. There is an easy way to circumvent having 3 pre-existing holes in your countertop and being able to use a 1 hole faucet system. Most new single-hole faucet systems have a metal plate that sits over all 3 holes. This allows you to mount your single-hole faucet system directly on the plate.
- If you’re looking for something with a sprayer head you can rest assured detachable sprayer heads come in a single hole and 3-hole system faucet. I highly recommend using a faucet with detachable sprayer heads. You can use it for things like washing pets, kids, and more. I’ve even seen modifications where people extend it right out to use it as a showerhead!
Conclusion
Before you attempt any of these DIY repairs for the faucets in your RV, always turn off the water mains that connect to the faucet you’re working on – this is an important step to take to ensure that your water is under control.
Additionally, when operating your faucet for the first time after repairing or replacing some parts, do not fully open the valves to full water pressure. Open the valves slowly to check if it is still leaking, then slowly turn it up to full pressure once you’re sure your leak has been fixed.